Sub Title

Tuesday, October 22, 2024

Reimagining the Power Platform: How I Would Have Built It Differently


Introduction:

The Power Platform is an incredible suite of tools. With Power BI, Power Apps, Power Automate, and Power Virtual Agents, Microsoft has provided a comprehensive set of capabilities for organizations to streamline processes, improve decision-making, and foster collaboration. But as with any platform, there are always areas for potential improvement.

In this blog post, I’m going to walk through how I would have approached building the Power Platform if I had a clean slate. This isn't to say the current iteration isn’t impressive—it certainly is—but these are just a few tweaks and design considerations that, from my perspective, would make the platform even more powerful and user-friendly.


1. Data-Centric Foundation

Current State: The Power Platform is built on Dataverse, which is great for managing data across apps and integrations. However, Dataverse is often seen as "just another database" by users, sometimes creating confusion around its role.

What I Would Change: I’d build the Power Platform around data as a core asset. Everything should be designed with data centrality in mind, ensuring seamless integration across systems. There should be clearer messaging that Dataverse is the glue holding everything together, not just another database, and its power should be fully leveraged from the start.

Why It Matters: When businesses see data as the core of their operations, they can make more informed decisions. This would help Power Platform users recognize the importance of data unification across tools and push them to build solutions with a holistic view of their data assets.


2. Unified User Interface

Current State: Each product in the Power Platform has its own interface, and while there are consistencies across Power BI, Power Apps, and Power Automate, they still feel somewhat separate.

What I Would Change: I’d aim for a more unified interface where users can seamlessly switch between Power Apps, Power Automate, and Power BI without having to hop between different screens. This could be similar to what Microsoft Teams does, where users have apps embedded inside the same workspace.

Why It Matters: A unified UI reduces friction. Users would no longer have to re-orient themselves as they switch between tools. This would foster a more streamlined workflow, saving time and reducing the cognitive load on users.


3. Enhanced Collaboration Tools

Current State: The Power Platform enables team collaboration, but the collaboration tools (like commenting, shared workspaces, etc.) could be better integrated.

What I Would Change: I’d build in more robust real-time collaboration features, similar to how users can co-edit in Office 365 products. Imagine building a Power App or an automated workflow while chatting with your team in real-time, all within the same interface.

Why It Matters: Collaboration is key to building effective solutions quickly. Improved collaboration would enhance productivity, reduce back-and-forth, and empower teams to iterate faster.


4. Pre-Built Templates and AI Recommendations

Current State: There are a good number of templates for Power Apps and Power Automate, but they often feel like starting points rather than fully-fledged solutions.

What I Would Change: I’d incorporate more AI-driven recommendations and pre-built templates based on industry-specific best practices. This would make the Power Platform more accessible for users with less technical expertise and enable organizations to get more value out of the box.

Why It Matters: By leveraging AI to guide users towards the right solutions, you remove barriers to entry and speed up the development process. Additionally, pre-built templates tailored to specific industries or common use cases would minimize the need for heavy customization.


5. Marketplace for Apps and Automations

Current State: Power Platform users can share apps or automations within their organizations, but there’s not a robust public marketplace to share solutions outside of their own organizations.

What I Would Change: I’d build a marketplace where users can share their apps, automations, and insights across the broader Power Platform community. This would be similar to how app stores work, where users can browse, download, and install community-created tools.

Why It Matters: A marketplace would encourage innovation and community collaboration. It would allow users to quickly find solutions to common problems without having to reinvent the wheel, thereby increasing the overall value of the platform.


6. Low-Code and Pro-Code Harmony

Current State: Power Platform is predominantly a low-code environment, but as more complex use cases emerge, the need for pro-code capabilities grows.

What I Would Change: I’d make sure there’s a perfect balance between low-code and pro-code. By embedding more developer-friendly tools within the platform (like custom APIs, more advanced scripting languages, etc.), Power Platform would better cater to both citizen developers and professional developers alike.

Why It Matters: Ensuring harmony between low-code and pro-code ensures that organizations can handle both simple and complex use cases without needing to switch platforms or adopt other solutions. It also allows companies to scale their solutions more effectively.


Conclusion: Building a Stronger Power Platform

The Power Platform is already a robust toolset, empowering organizations to automate workflows, create apps, and analyze data without heavy technical investment. However, by making the platform more data-centric, enhancing collaboration, unifying the user interface, and providing more out-of-the-box tools, I believe Microsoft could make the platform even more valuable to businesses around the world.

At its heart, a more interconnected, user-friendly, and scalable Power Platform will benefit everyone, from citizen developers to advanced tech teams, allowing for a more seamless and integrated way of building the future.


Monday, October 14, 2024

Facets of D365/Power Platform Fit-Gap Analysis

 Introduction:

What's needed to perform a fit-gap analysis? What is it?

A fit-gap analysis identifies the differences between current business processes and system functionalities versus desired outcomes or requirements. It sounds simple, right?

However, for D365 or Power Platform, it involves analyzing business requirements against specific D365 CE modules or the Power Platform in general, which can be more challenging than it seems.

I'll explore the different "facets" of fit-gap analysis, explain my approach to each, and share real-world examples from my experience.

Let's dive into it.

Requirements Statement:

Let's assume we've just completed a session/meeting and have a set of high-level requirements. The customer, having seen D365 demos, is eager to adopt it for sales or case management.

D365 CE's advantage is its pre-built features and robust Dataverse, with standard tables for common scenarios like the Common Data Model (CDM). However, the key problem is matching these features to the customer's unique needs.

A fit-gap analysis helps align system features with business needs, identifying where features meet (fit) requirements and where they fall short (gap).

For example, a tour operation company may need to:

  • Capture incoming client requests
  • Maintain a list of business clients and contacts
  • Manage a catalog of tour offerings and prices
  • Create tour proposals
  • Maintain a list of vendors
  • Send notifications to clients and vendors


Based on the above requirements, we can typically map them to some out-of-the-box tables, as shown below:

Out of Box

Customized

Lead

Client Request

Account

Client

Contact

Vendors

Opportunity

Tour

Product

Vendor offering


Mapping these requirements to existing tables/features usually seems straightforward, but there are cases when it isn't.

The last requirement, notifications, can be tricky. Customers often expect an out-of-the-box solution and are hesitant about additional customization costs, which can lead to ongoing support expenses.

Power Platform offers options like classic emails (often ignored by receivers) and more modern in-app notifications. But is it a "fit" if we need a custom workflow or Power Automate Flow? Can we still call it a fit when complex logic requires a week of development? These grey areas can make even seasoned professionals question their approach. So, if you're facing these thoughts, we all are on the same journey.

Partial Fit:

The concept of a "partial fit" is often used to address this.

Explain to customers that while tools like Power Automate can meet their requirements, they may be needed to deliver the outcome fully. This reassures them that Power Platform is a solid investment while being transparent about the extra development required for their specific needs.

Is it a fit or not, or in between?

Fit-Gap Analysis:

Sometimes, a fit-gap analysis becomes a competition, especially when customers are still evaluating different options, like D365, Power Platform, or non-Microsoft products.

The goal is to ensure that the D365/Power Platform stands out and best "fits" their requirements. While doing this, we can also suggest alternative approaches to achieve the same outcomes.

So far, customers have been open to new working methods and proposed process improvements.

Unavoidable Gaps:

Some gaps are unavoidable.

For example, a customer wanted users to set their own notification preferences when a record updates or status changes.

While this is standard in Azure DevOps, it isn't easily possible with D365/Power Platform without custom development. In such cases, even calling it a "partial fit" feels like a stretch.

Integration requirements often fall into this grey area. If custom connectors or plugins are needed, I usually classify it as a gap. However, I label it as a partial gap if I can use Power Automate and existing connectors.

Still, marking something as a gap can heavily influence the customer’s final decision, especially when dealing with uncommon software integrations. Wouldn't you agree?


Fit Percentage:

The number games, some customers are very “number-driven.” Their focus is on the numbers and the highest percentage of "fit” will win it. This is challenging but it's a fact to face

Generally, D365 and Power Platform score well. Losing a prospect can leave us wondering where we lost it, whether the fit-gap score, cost, or something else tipped the scales.

I hope this will be helpful

Thanks!!!

Conclusion

At its core, fit-gap analysis is a powerful tool for the early design stages, ensuring our solutions follow a "product-first principle."

However, it's essential to go beyond a checkbox approach when comparing options. The real goal is to give customers a long-term vision of how Power Platform can benefit their business and deliver real value.

With Microsoft continually adding new features, I'm seeing more "fits” than ever, making the future of fit-gap analysis even more exciting!

Wednesday, March 15, 2023

Virtual Tables Creation Wizard is now in Public Preview


Virtual Tables Creation Wizard is now in Public Preview

Virtual tables are the new buzzword in the world of data management and analytics. They are a great way to simplify data management and enhance productivity. Virtual tables have been around for a while, but the process of creating them has been quite complex and time-consuming. However, that is no longer the case, as the Virtual Tables Creation Wizard is now in Public Preview.

The Virtual Tables Creation Wizard is a new tool that simplifies the process of creating virtual tables. With this wizard, users can easily create virtual tables with a few clicks. It eliminates the need to write complex SQL scripts and reduces the time required to create virtual tables. The wizard is now available for all users to try and test, so anyone can take advantage of virtual tables' benefits.

Virtual tables provide several benefits to data management and analytics. They allow users to create a single source of truth for their data, eliminating the need to create multiple copies of the same data. This results in more accurate and consistent data, crucial for making informed decisions. Additionally, virtual tables can simplify data management by reducing the complexity of data structures and making it easier to access data from multiple sources.

The Virtual Tables Creation Wizard is a user-friendly tool that makes it easy for anyone to create virtual tables. The wizard guides users through creating virtual tables step by step. It asks for the required information, such as the data source and the data structure, and then automatically creates the virtual table. The virtual table can then be accessed and used like any other database table.


Virtual Tables Wizard

Navigate to the maker portal. Move to either Tables or Solutions and choose + New table > + New table from external data.


Either you can create a new connection or select to use the SharePoint or SQL Server connection or prompt for another connection to get the data from the desired source.n to get the data from the desired source.


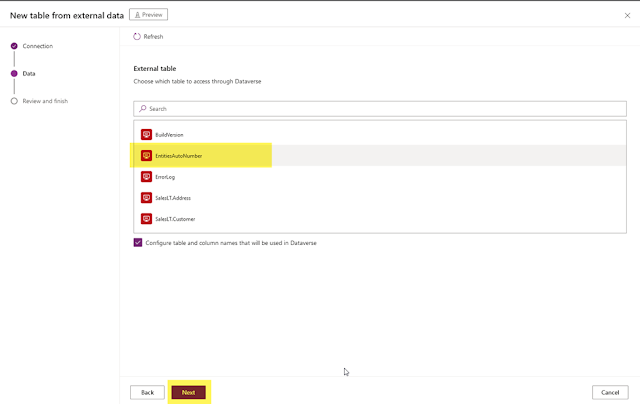
After using the connector and getting the table list in the Database, we need to select the table we need to add and click Next.


After that, we are presented with the list of mapping columns and the unique column used as a primary key from the source table.


After Next, we will see the final Review list and, if needed, any changes and then click on Finish.


Below is the Table that is created in the Dataverse Environment.


Benefits of virtual tables for the power platform

Virtual tables, or "materialized views," can benefit Power Platform users. Here are some of the key benefits:

  1. Improved performance: Virtual tables can improve query performance by precomputing and storing complex queries, which users can quickly access.
  2. Simplified data access: By pre-aggregating or filtering data, virtual tables can simplify data access and make it easier for users to find the information they need.
  3. Reduced data duplication: Virtual tables can help reduce storage requirements and improve data consistency by storing precomputed results rather than duplicating data.
  4. Increased scalability: Virtual tables can help improve scalability by reducing the load on underlying data sources, mainly when dealing with complex or resource-intensive queries.
  5. Enhanced security: Virtual tables can provide an additional layer of security by limiting access to specific data sources or tables and restricting the data that can be accessed based on user roles and permissions.

Overall, virtual tables can help Power Platform users improve performance, simplify data access, reduce duplication, increase scalability, and enhance security, making it easier to work with complex data sets and achieve their goals more efficiently.

Conclusion

In conclusion, the Virtual Tables Creation Wizard is an excellent tool for simplifying data management and enhancing productivity. It is now available in Public Preview so that all users can take advantage of its benefits. Whether you are a seasoned data analyst or just starting, the Virtual Tables Creation Wizard is a must-try tool for anyone who wants to simplify data management and make informed decisions.

Tuesday, February 14, 2023

Brief Idea for Navigate To Enhancement in Microsoft Dynamics 365Dataverse

 Microsoft Dynamics 365/Dataverse has been a popular platform for businesses to manage their operations, customer relationship management, and financials. The platform provides various tools and features to help businesses streamline their processes, improve efficiency, and make data-driven decisions. One of the key features in Dynamics 365/Dataverse is the NavigateTo() method, which allows users to easily navigate to different areas of the platform, including records, forms, and pages.

Recently, Microsoft has made some enhancements to the NavigateTo() method in Dynamics 365/Dataverse, making it even more powerful and user-friendly. Here is some of the new enhancements to the NavigateTo() method in Dynamics 365/Dataverse:

Improved Navigation: The NavigateTo() method now provides a more streamlined navigation experience for users, making it easier to access the areas of the platform they need. The new navigation options allow users to jump to specific records, forms, or pages with just a few clicks.

Better Performance: The NavigateTo() method has been optimized to improve its performance, making it faster and more responsive. This will make it easier for users to access the information they need, reducing the time it takes to complete tasks and making the platform more efficient.

Enhanced Customization: The NavigateTo() method now supports customization options, allowing developers to tailor the navigation experience to meet the specific needs of their organization. This will allow businesses to create a more personalized experience for their users, making it easier for them to access the information they need.

Improved Security: The NavigateTo() method has been enhanced to include improved security features, making it even more secure. This will ensure that sensitive information is protected and users can access only the information they need to complete their tasks.

Use Case:

I want to determine which Business Process Flow should be accessible by default when I open an entity record, and I also want to enlarge the currently active stage.

In this example, I'm utilizing the Lead entity, which has two Business Process Flows enabled for it, with Lead to Opportunity Sales BPF as the default BPF.

When you create a business process flow in CRM, a new entity with the name of the business process flow is created in the background. All data pertaining to the business process flow is kept in this entity. In this case, we would need the BPF Process Id, BPF instance Id, and Active Stage Id values from the Business Process Flow entity fields to open the BPF records. I am now utilizing the Dynamics 365 endpoint API to obtain the required value.

Below is the sample code that you can use to achieve this

function openRecordBPFUsingNavigateTo(){
  let pageInput = {};
  let navigationOptions = {};
  try {
   pageInput = {
    pageType:"entityrecord",
    entityName:"lead",
    entityId:"Lead Record Id",
    processId:"BPF Id",
    processInstanceId:"BPF Instance Id",
    isCrossEntityNavigate:true,
    selectedStageId:"Stage Id"
   }
   navigationOptions= {
    target:2,
    height:{ value: 70, unit: "%" },
    width:{ value: 60, unit: "%" },
    position:1
   };
   Xrm.Navigation.navigateTo(pageInput,navigationOptions).then((success)=> { 
    //Code which you want to execute on success
   },(error) => {
    //Code which you want to execute error to handle on exception
   });
  } catch(error) {
   //Code which you want to execute error to handle on exception
  }
}


To know more about the attributes used, please follow this link.

In conclusion, the enhancements to the NavigateTo() method in Dynamics 365/Dataverse will provide a better user experience, improve performance and make it easier for businesses to access the information they need to drive their operations. These enhancements will help businesses take advantage of the power of Dynamics 365/Dataverse and make data-driven decisions to improve their business outcomes

Wednesday, February 1, 2023

Performance Improvement in FetchXml Request

Overview:

We will discuss the common issue that we usually face in our projects. We have slowness of the application, and most of the time, it's identified that we had a FetchXml request that we are using to sync with the Microsoft Dataverse.

Introduction:

When working on dynamic projects, we usually use an easy way to query and execute the FetchXml to get the results. For the construction of the FetchXml, we mostly used Advance Find, and also we can use the Xrm Toolbox for building a FetchXml.

The most common issue we faced was the slowness of the FetchXml query as we moved toward the complexity. There is a way that we can use to resolve this issue.

How to improve the slowness:

The traditional fetch will pull all the columns for the top table records given in the filter criteria. For example, we query to pull 500 records from the table containing 100 columns and 100000 approx. Rows that meet the filter criteria. This case will give us the following issues.

·         To return the result set of 500 records, it pulls almost 99500 rows with all columns and then returns 500 rows.

·         Optimizer for the query can generate an arbitrary order when using the child columns for the retravel but result in a data order we don't want to use.

We can use the LateMaterialize option in the FetchXml request to resolve the slowness issue. It will break the request into smaller, usable segments, improving the performance of long-executing FetchXml requests. The improvement mostly depends on the data distribution for each table and link table used.

After using the LateMaterialize, the created fetch will.

·         Only pulling the primary ID of the top number of records given in the query also fulfilling the filter criteria.

·         Retrieved on the needed data column based on the primary IDs given on the filter criteria. Like if six columns are needed in the given query. It will on retrieving them.

Example for using LateMaterialize in FetchXml:

<fetch version="1.0" output-format="xml-platform" latematerialize="true" mapping="logical" distinct="true">

                <entity name="[entity]">

                                <attribute name="[attribute]" />

                                <link-entity name="[entity]" from="[linked entity]" to="[linked entityid]" link-type="outer" alias="[alias]">

                                                <attribute name="[name of linked entity column]" />

                                </link-entity>

                                <filter type=[filter type]>

                                                <condition attribute="[column]" operator="[operator]" value="[value]"/>

                                </filter>

                </entity>

</fetch>


Above is the sample we can use to modify our FetchXml query to resolve the optimization issue.

<fetch version="1.0" output-format="xml-platform" latematerialize="true" mapping="logical" distinct="true">

                <entity name="account">​

                                <attribute name="accountnumber" />​

                                <attribute name="createdby" />​

                                <attribute name="ownerid" />​

                                <link-entity name="account" from="accountid" to="parentaccountid" link-type="outer" alias="oaccount">​

                                                <attribute name="createdby" />

                                                <link-entity name="account" from="accountid" to="accountid" link-type="outer" alias="oaccount1">​

                                                                <attribute name="createdby" />​

                                                                <attribute name="accountid" />​

                                                                <attribute name="name" />​

                                                </link-entity>​

                                </link-entity>​

                                <link-entity name="account" from="accountid" to="accountid" link-type="outer" alias="oaccount2"/>

                                <filter type='and'>​

                                                <condition attribute="statecode" operator="eq" value="2"/> ​

                                </filter>​

                </entity>​

</fetch>


So, with the above FetchXml, we are almost retrieving the account hierarchy. As a developer, we know that if we use the self-referential relationship, it will affect the performance of the project badly. Still, by using LateMaterialize, we can resolve that issue.

LateMaterialize is the most beneficial.

·         Query where there are one or more linked conditions to other tables, and their columns are used for the data.

·         Query where there are tables that have many columns and logical columns.

I hope this will be helpful.

Thanks.

Conclusion

So, in this blog, we give you an option that can be utilized to resolve the performance-related issue faced while using FetchXml in the project.  

Friday, January 27, 2023

New Features and enhancement for Power Apps Portal in Power Platform 2023 Release Wave 1

Power Apps Portal, a component of the Power Platform, allows businesses to create and publish web portals for external audiences. The Power Platform 2023 Release Wave 1 brings several new features and enhancements to Power Apps Portal, making it even more powerful and user-friendly.

One of the most notable changes in this release is the introduction of the Power Apps Portal Studio. This new feature allows users to create, edit, and manage web portals using a drag-and-drop interface, making it easier for non-technical users to create and customize portals without coding.

Another new feature is the ability to create custom forms for web pages. This feature allows businesses to create custom forms for specific web pages, such as contact forms or event registration forms, which can be easily embedded into a portal.

The Power Apps Portal also now supports creating and managing custom pages. This allows businesses to create custom pages that can be used for specific purposes, such as landing pages or product pages.

In addition to these new features, the Power Apps Portal has also received several enhancements, including improved performance, enhanced security, and better integration with other components of the Power Platform.

The new features and enhancements in Power Platform 2023 Release Wave 1 make Power Apps Portal an even more powerful tool for businesses looking to create and manage web portals for external audiences. With its user-friendly interface and powerful capabilities, businesses of all sizes can now easily create and customize web portals that meet their specific needs.

Thursday, June 24, 2021

Microsoft Dynamics 365 Trial Instance.


In this blog, we will be giving you the steps to create the D365 trial instance. That can be utilized for 30 days. If you want to move that instance from trial to the license instance, you can coordinate with Microsoft.

Below are the steps you need to follow to create the 30 days Microsoft Dynamics 365 Trial instance in a New User interface.

Steps to Create Dynamics 365 Trail Instance

Step 1: Browse the link https://trials.dynamics.com/ .

Step 2: Click on the link Sign up here. As shown in the below image.


Step 3: After that, another prompt window open. Click on the link at the bottom right corner with text No,continue signing up.


Step 4: Now, you will be prompted to give an email address which can be your Work or Personal Email Id. After that, click on Next.


Step 5: Now, you will be prompt to set up the account. For that, click on the Setup account.


Step 6: Once you click on the setup account, you will be asked for personal information and then click on the Next.


Step 7: Now, you will be asked to provide the Country Code and your Phone number for the OTP verification. You also need to choose either to Text me or Call me. Now click on the Send Verification Code. Keep in mind that which option is selected by you will be used by Microsoft to be informed you of the Verification code that will be needed in the next step.


Step 8: Now, provide the Verification code received from Microsoft on your mobile and then click on the Verify. If you cannot receive the code or the mobile number provided in the last step is wrong. You also can click on the Change my phone number button and then go back to step 7.


Step 9: Now, you will be asked to provide a unique domain for your trial instance and check its availability by clicking on the Check availability. If that domain is available, click on the Next.


Step 10: Now, you will be asked to provide the User Name, Password, and Confirm Password for the user that you want to create in the instance. Once you provided it, click on Sign up.


Step 11: Once the signup is completed, you will see Microsoft's below information page. Save the user id that is displayed under the title You user ID. After that, click on the Get started.


Step 12: Now, you will be asked to create an environment where you directly get the prompt, as shown below. Or you need to click on the +New button at the top left corner.

Now provide the required fields needed to create the environment like Name, Type (Trial), Region (Nearest region to your location).

Once you completed this form, click on the Next button at the bottom right corner.


Step 13: After that, you will be asked to provide some basic information to create the database for the Trial instance.

You will need to provide some required fields for creating a Database like Language, URL(unique if you want it.), and Currency.

Once you provided it, then click on the Save


Step 14: After saving, you can see that it starts creating the instance and the status of your environment will be PreparingInstance. Once it’s completed, the State will be changed to Ready.

Now, you can open your environment by clicking on the button at the top left corner Open environment


Hope this will be helpful.

Thanks!!!

Conclusion

So, We have successfully created a trial instance of Microsoft Dynamics 365 instance for 30 days.