In this blog, we will be giving you the steps to create the D365 trial instance. That can be utilized for 30 days. If you want to move that instance from trial to the license instance, you can coordinate with Microsoft.
Below are the steps you need to follow to create the 30
days Microsoft Dynamics 365 Trial instance in a New User interface.
Steps to Create Dynamics 365 Trail
Instance
Step 1: Browse
the link https://trials.dynamics.com/
.
Step 2:
Click on the link Sign up here. As
shown in the below image.
Step 3:
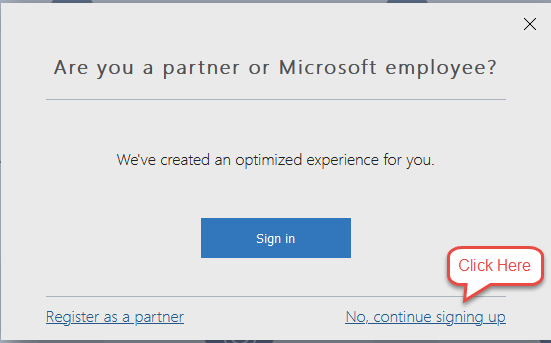
After that, another prompt window open. Click on the link at the bottom right
corner with text No,continue signing up.
Step 4: Now,
you will be prompted to give an email address which can be your Work or
Personal Email Id. After that, click on Next.
Step 5: Now,
you will be prompt to set up the account. For that, click on the Setup
account.
Step 6: Once
you click on the setup account, you will be asked for personal information and
then click on the Next.
Step 7: Now,
you will be asked to provide the Country Code and your Phone number
for the OTP verification. You also need to choose either to Text me or Call
me. Now click on the Send Verification Code. Keep in mind that which
option is selected by you will be used by Microsoft to be informed you of the
Verification code that will be needed in the next step.
Step 8: Now,
provide the Verification code received from Microsoft on your mobile and then
click on the Verify. If you cannot receive the code or the mobile number
provided in the last step is wrong. You also can click on the Change my
phone number button and then go back to step 7.
Step 9: Now,
you will be asked to provide a unique domain for your trial instance and check
its availability by clicking on the Check availability. If that domain
is available, click on the Next.
Step 10:
Now, you will be asked to provide the User Name, Password, and Confirm Password
for the user that you want to create in the instance. Once you provided it,
click on Sign up.
Step 11:
Once the signup is completed, you will see Microsoft's below information page.
Save the user id that is displayed under the title You user ID. After
that, click on the Get started.
Step 12:
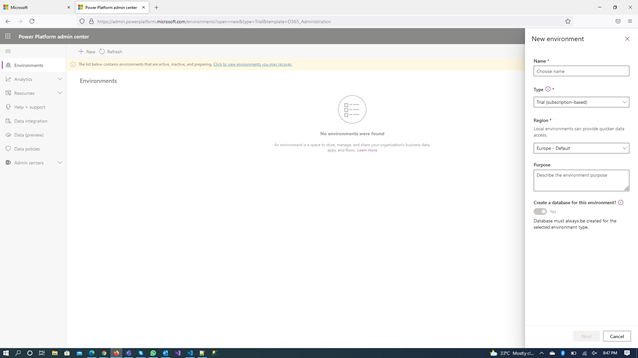
Now, you will be asked to create an environment where you directly get the
prompt, as shown below. Or you need to click on the +New button at the
top left corner.
Now provide the required fields
needed to create the environment like Name, Type (Trial), Region
(Nearest region to your location).
Once you completed this form, click
on the Next button at the bottom right corner.
Step 13:
After that, you will be asked to provide some basic information to create the
database for the Trial instance.
You will need to provide some required fields for
creating a Database like Language, URL(unique if you want it.), and Currency.
Once you provided it, then click on the Save
Step 14:
After saving, you can see that it starts creating the instance and the status
of your environment will be PreparingInstance. Once it’s completed, the State
will be changed to Ready.
Now, you can open your environment by clicking on the
button at the top left corner Open environment
Hope
this will be helpful.
Thanks!!!
Conclusion
So, We have successfully created a trial instance of
Microsoft Dynamics 365 instance for 30 days.


No comments:
Post a Comment